Wire Wrap Woven Pendant Tutorial part 1

If
you happen to wander into this post, please bear with me as I work out
writing a decent tutorial. I have found that taking this many pictures
is an exercise regime all by itself! So please feel free to comment any
suggestions, or questions if I miss something. I would love the
feedback.
Materials and Tools

masking tape or small clamps (which ever you find more convenient)
wire straighteners
bent nose pliers, or chain nose
wire cutters
round nose pliers
18 or 20 gauge wire (for frame)
24 gauge wire (for weave)
flat circular focal
(this onyx was 1.5 inch in diameter)

one lap weight to keep you in your chair!

To
get started with the frame I form the 20g wire around the outer edge of
the focal. Leave just a hairline of space between the wire and the
focal for wrapping. Cut the wire, leaving at least 2 inch tails at the
top.

Next
cut 2 more 20g wires the same size as this first frame work and do a
loose shaping of the circle. I find it easier to hold the 2 together and
shape at the same time for continuity.At the bottom center give the 2
wires a slight pinch to create a soft point. The curves need to be
slightly smaller than the original diameter..set each piece of new wire
on the focal and push gently to shape with the face curve of the stone/
bead. These two wires will be taped in place at the bottom center. One
on the front and one on the back. This will cage the focal when it's
woven, and make sure the back is pretty too.


Make sure all the tails at the
top of the tear drop shape are in front, center, and back order on both
sides. looking at the front of the piece determine how far away from the
focal you want the top of the teardrop frame point to be. hold the
point there, and tape (or clamp) on each side (all 3 of the wires
keeping them in order) right next to the 'V' junction to hold the point
space in place.
To start on the weaving I cut 2 pieces of the 24g wire approx 30 inches long. One for each side. I like to work both sides simultaneously in order to keep the shape , and tension true. At this point I work by holding the piece in hand, but some people might find a bench vice or clamp handy to hold the piece for them. If you prefer to use one of these tools, please use some padding or batting to protect your pendant from possible scratches.

To
start weaving/wrapping we're going to go back to elementary school and
use the old over / under technique we all used making goofy colored pot
holders.
- Start at the top take the 24 g wire and slide it under just the center frame wire leave an inch or so tail.
- wrap the 24g around that center wire 4 times to create a small coil.
- use the bent nose pliers to crimp the coil together and nudge to the top. We're going to leave the tail there to be able to hold the coil in place while we start the wrap
- whichever side the long end is on start by wrapping 'over' that side frame wire twice
- the pattern should be: over back wire twice, back under center twice,over front wire twice then back the other direction. alternating the over/ under.
- for now just nudge the wires close to each other with your thumb.

Weave
down about an inch and repeat the process on the other side to keep the
tension balanced. At this point remove the the side pieces of tape.
Clean any tape residue from the wire and focal now. Continue weaving
down each side. Depending on the size of your pendant you will have
enough wire to meet both wraps at the center bottom. In my case I cut a
third length to finish the bottom. If your wire breaks, or you need more
length. Make sure you end on the center frame and leave a small tail.
To start the connecting weave, wind your around the center frame wire at
the bottom, lining up the wrapping wire at it's halfway point. Continue
the pattern of weaving up both sides to end and meet on the center wire
with 2 wraps where you left off


To
finish the tails lay the wire over the center wire, and with the flat
side of you cutters laying against the center wire, snip the wrapping
wire leaving the tiniest fraction to tuck under the center frame wire.
Use the tip of you bent nose or chain nose pliers to push that end under
the frame wire to hide it. Do this with all tails.


So
here's a good point to take a break and work the kinks out your
fingers, and get some chocolate energy! Stay tuned for part 2
Embellishing, and the Bail. I will try to get the rest posted by
tomorrow! :)
Bright creative blessings, Theresa
Bright creative blessings, Theresa
Hey again all you creative beauties. Thanks for hanging in there for
part 2 :) Were you brave enough to start wrapping? Maybe printed it off
for later reference? (like I tend to do) My mum ( the Baroness) said she printed it off and hung it on the fridge! WOOHOO my artwork is still on the family art gallery :)
I left off with finishing the weave that cages the focal piece. Let's tighten that weave up by gently pinching the double coils along each of the frames. This will help even out the spacing between the coils.
I left off with finishing the weave that cages the focal piece. Let's tighten that weave up by gently pinching the double coils along each of the frames. This will help even out the spacing between the coils.


Bail and Embellishments
1. Remove the tape (or clamps) clean any tape residue.
2.Bend the two center wires straight up at the 'V; junction


3.With
the front of the piece facing you, bend the front center wire toward
you so it's now at a 90 degree angle from the piece.

4. Coil that wire around the base of the standing wire3 times. Snip, and tuck. You might have to file the end to smooth .


5. measure to four side tails to the same length, mark and snip so they are all the same.

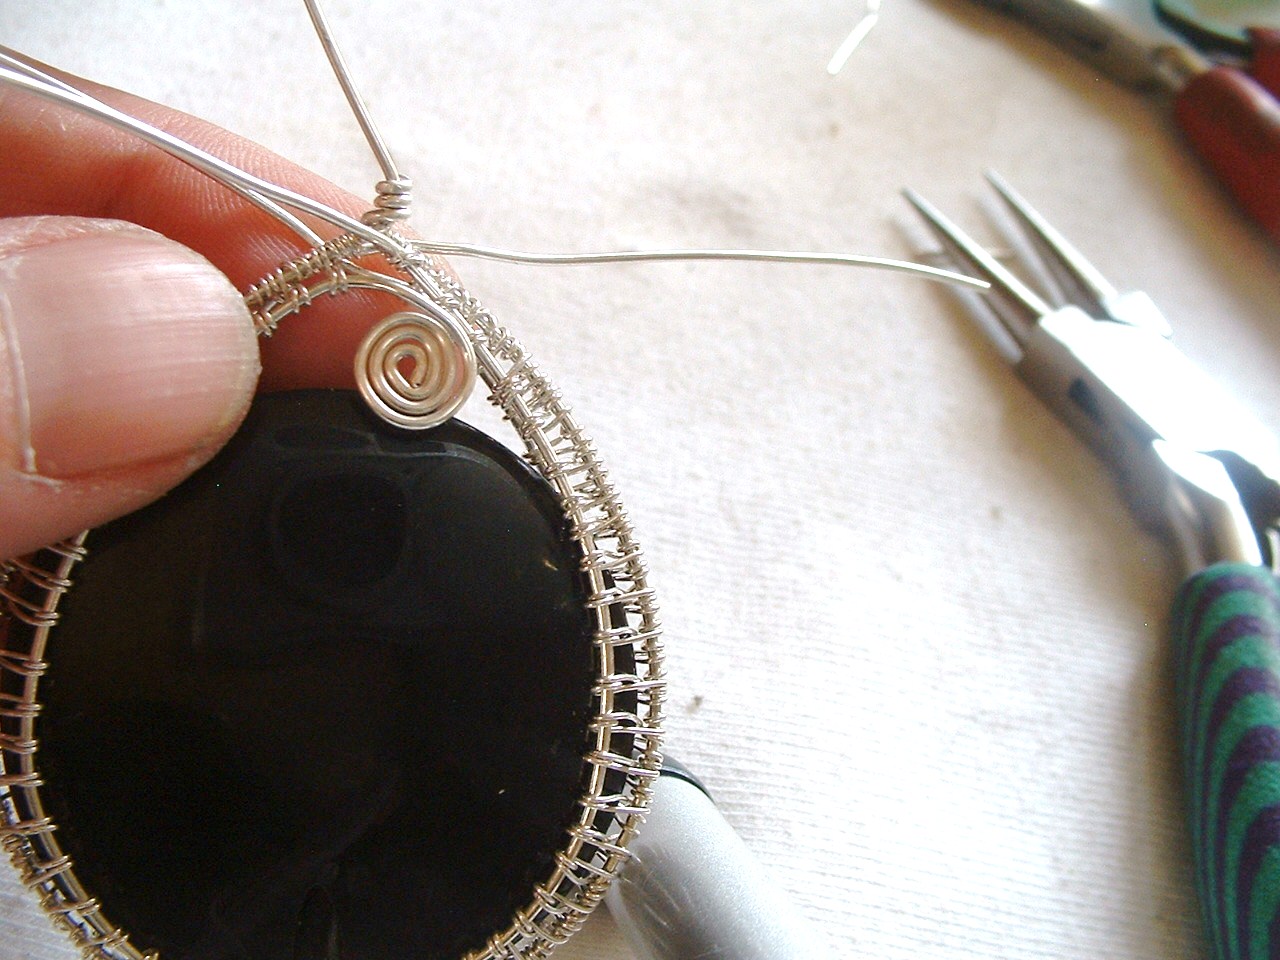
6. Using the tip of your round nose pliers make a tiny loop facing downwards in the end of each of the 4 tails.


7.
to form the swirl hold the loop (gently) in your chain/bent nose pliers
and bend the wire around. Don't use the pliers to move the swirl (might
leave marks) use the pliers only to hold, and use your fingers to bend.
Finish all 4 swirls, and push to place them where you want them.


8.To
make the bail for the chain, bend the last standing wire towards you at
a 90 degree angle at the base of the coil. grasp that point with your
round nose pliers and wrap the wire away from you to form the loop
.


9. Keep holding the loop with the pliers and coil that tail around the
top of the other coil once.Use the chain or bent nose pliers to pinch
all 4 coils together. Then we are going to make another swirl with that
tail, and push it down on the front in front of the coil on the bail.

So now what to you do with an UGLY spot? Small scratch/chip/weird drill
spot on the focal? You can cover with further embellishments. Personally
I won't sell this piece because the of the (big) ugly spot, but it was
handy to use for this tutorial. To cover the ugly spot I made an 'S'
shape swirl. Same process as above. Cut a 4 inch piece of the 20g wire
and make the small loops at each end. One pointed up one pointed down.
Then I loosened the very outer row on each swirl to be able to use the
24g wire to wrap it to the inner frame to cover the ugly spot. I did 3
wraps around each connection point, and snipped and tucked the ends.


Okay guys, that's it! :) If you try this out I would love to see your versions. Feel free to post pics on my facebook page or link here in the comments. I would love any feedback or questions you may have. Good luck!
Bright Creative Blessings, Theresa ♥
FAIR USE STATEMENT This website article may contain copyrighted material
the use of which has not been specifically authorized by the copyright
owner. This material is being made available for the purpose of
education, commentary and criticism, it is being distributed without
profit, and is believed to be "fair use" in accordance with Title 17
U.S.C. Section 107.

Great for begginers! And different from the standard stone bending ones. Thank you for this tutorial :)!
ReplyDeleteNice post. I learn something new and challenging on sites I
ReplyDeletestumbleupon every day. It will always be interesting to read content from other authors and practice a little something from their sites.