Social Icons

None - Go Away
Showing posts with label Favorites. Show all posts

Sunday, December 13, 2015

Mandalas, Etch N Pearl Magic & Syndee Holt - Secret Tools Series: Pt 6


                  Who doesn't love the magic of a Mandala?

Although we all have our favorite tools & techniques, one of the tools at the Top of my favorites list is the Etch N Pearl 3 piece set brought to us by Sculpey products. They are so versatile & can create the look of Master Art pieces even by novice polymer clay artists. So, what are some of the easy Awesome ways we can play with these lovely ditties? Let's take a closer peak.

Place a center-piece pearl to finish your design
Fill a created space with different sized pearls for a cool dimensional look


Add circles & lines for surface design - quick & easy


Use the smooth sides to clean up rough edges


Create wonderful unique frames for your cabochons


Set includes 3 different sized hole makers 
Easily create home-made texture sheets
Create fun pearl dangles & the holes they peak out from

Turn a simple skinner blend into beautiful jewelry & scarf pins


Create Steampunk, Sea Urchins & Tentacles 


Use the needle tool ends for petite filigree surface work 


Perfect tool for adding findings


Create Polka Dot sheets + Ornate Endcaps


Detailed surface carving decoration


How EASY is it to master these 3 marvels? Here are some great tips & tricks from 
Master Artist Syndee Holt that will have you creating like a pro in no time!

1: Use the widest setting on your Clay Conditioning Machine to make a nice fat pearl.
2: Make your pearls on a smooth ceramic tile so that the pearls will stick to the tile and not in the tool. Then just peel up the remaining sheet of clay to expose your pearls.
3:  Dip the Etch n’ Pearl in water every couple of pearls – again so that they stick to the tile and not the tool. A small bottle cap works great.


Etch n’ Pearls are a great way to add color accents, create frames, cover seams.  They are also easy to get carried away with, like I did with the cutter bracelets.
4:  An empty clay wrapper with a little Sculpey Bake n’ Bond in it, a toothpick and you can securely attach your pearls  (** Note from Liz in Vegas,,, get out your white glue  :-)


5: Use the pokey end of the tool to not only press a hole in the pearl for more texture, but to help secure it to the clay surface below. See how it changes the whole look of the pearl?


6:  Try using other tools to create a texture.  For instance the rubber chisel end of the medium ball tool in the Sculpey Essential Tool Kit or the Style and Details kit makes a great phillips head screw look.  These are great for covering seams in clay like on these faux leather bracelets.
7: The pokey end of the tool makes a great scrap cleaner around the edge of the pearl.


8: Make the large pearl, use the medium ball tool to make a dent in it and add a small pearl of a different color to make a elegant decoration.


9:  Use the pearls to create a bezel for a cabochon. 


10:  Use thinner layers of clay to create polka dots that can be used alone or layered.  I prefer to make the thinner layers on paper so that the clay sticks in the tool until I lightly press it into place.  If the clay sticks to the paper, put the tool back over it and swipe the tool towards you to scoop up the polka dot.


BONUS:  The sheet of clay with the polka dots can be run through the clay conditioning machine to make ovals too! Here are some great examples of how you can use the Etch n’ Pearl tool in my recent creative map


Some other great links to Sculpey projects using Etch n’ Pearls include Amy Koranek’s bracelet where she used the pearls to hold the hardware         


Final Syndee Holt Photo:


Mandala Landscapes - Easy No Fail Perfection

What is it about Mandalas that seems to call to so many of us? The flow of perfect symmetry? The way the colors intertwine, so different & yet perfectly fitted like notes that compose that tune that touches us deep within? Maybe it's that they follow All the rules... & yet seem to break the rules at the same time? 

Maybe it's as simple as... they are just so freakin cool?

I LOVE Mandala Landscape art the same way I Love Natasha's, & adore doing them both for the same reason. Very simply, you really can't screw them up. Once you have a palette that works, the landscapes write themselves! Over the next week or 2 (best laid optimistic plans) I will begin posting my books - TONS of books. They will include boodles of Mandalas, Landscapes & Zentangle art. I'll be sharing the step by steps on how I create the different landscapes. Meanwhile, you can add a set of Etch N Pearl tools to your repertory for under $15.00 & begin having fun mastering the little dynamos.

For today, be well & Happy Claying!


FAIR USE STATEMENT
This website article may contain copyrighted material the use of which has not been specifically authorized by the copyright owner. This material is being made available for the purpose of education, commentary and criticism, it is being distributed without profit, and is believed to be "fair use" in accordance with Title 17 U.S.C. Section 107.

Tuesday, November 10, 2015

Pink Gardenia Flower Cane - Cristalline.blogspot.com


FAIR USE STATEMENT This website article may contain copyrighted material the use of which has not been specifically authorized by the copyright owner. This material is being made available for the purpose of education, commentary and criticism, it is being distributed without profit, and is believed to be "fair use" in accordance with Title 17 U.S.C. Section 107.

Monday, November 9, 2015

Ghost Canes of Mica Shift - Cristalline.blogspot.com


FAIR USE STATEMENT This website article may contain copyrighted material the use of which has not been specifically authorized by the copyright owner. This material is being made available for the purpose of education, commentary and criticism, it is being distributed without profit, and is believed to be "fair use" in accordance with Title 17 U.S.C. Section 107.

Sunday, November 8, 2015

New Twist on Old Brain Cane & Kaleidoscope - https://www.facebook.com/totiayno


FAIR USE STATEMENT This website article may contain copyrighted material the use of which has not been specifically authorized by the copyright owner. This material is being made available for the purpose of education, commentary and criticism, it is being distributed without profit, and is believed to be "fair use" in accordance with Title 17 U.S.C. Section 107.

Saturday, November 7, 2015

COOL Extruded Cabochon & Earrings - https://www.facebook.com/totiayno


FAIR USE STATEMENT This website article may contain copyrighted material the use of which has not been specifically authorized by the copyright owner. This material is being made available for the purpose of education, commentary and criticism, it is being distributed without profit, and is believed to be "fair use" in accordance with Title 17 U.S.C. Section 107.

Friday, October 30, 2015

Wire Wrapping a Cabochon - Flight-Fancy.Blogspot.com

Wire Wrap Woven Pendant Tutorial part 1

If you happen to wander into this post, please bear with me as I work out writing a decent tutorial. I have found that taking this many pictures is an exercise regime all by itself! So please feel free to comment any suggestions, or questions if I miss something. I would love the feedback.
Materials and Tools


masking tape or small clamps (which ever you find more convenient)
wire straighteners
bent nose pliers, or chain nose
wire cutters
round nose pliers
18 or 20 gauge wire (for frame)
24 gauge wire (for weave)
flat circular focal 
(this onyx was 1.5 inch in diameter)
 
one lap weight to keep you in your chair!

To get started with the frame I form the 20g wire around the outer edge of the focal. Leave just a hairline of space between the wire and the focal for wrapping. Cut the wire, leaving at least 2 inch tails at the top.
Next cut 2 more 20g  wires the same size as this first frame work and do a loose shaping of the circle. I find it easier to hold the 2 together and shape at the same time for continuity.At the bottom center give the 2 wires a slight pinch to create a soft point. The curves need to be slightly smaller than the original diameter..set each piece of new wire on the focal and push gently to shape with the face curve of the stone/ bead. These two wires will be taped in place at the bottom center. One on the front and one on the back. This will cage the focal when it's woven, and make sure the back is pretty too.


Make sure all the tails at the top of the tear drop shape are in front, center, and back order on both sides. looking at the front of the piece determine how far away from the focal you want the top of the teardrop frame point to be. hold the point there, and tape (or clamp) on each side (all 3 of the wires keeping them in order) right next to the 'V' junction to hold the point space in place.

To start on the weaving I cut 2 pieces of the  24g wire approx 30 inches long. One for each side. I like to work both sides simultaneously in order to keep the shape , and tension true. At this point I work by holding the piece in hand, but some people might find a bench vice or clamp handy to hold the piece for them. If you prefer to use one of these tools, please use some padding or batting to protect your pendant from possible scratches.
  

To start weaving/wrapping we're going to go back to elementary school and use the old over / under technique we all used making goofy colored pot holders.

  1. Start at the top take  the 24 g wire and slide it under just the center frame wire leave an inch or so tail.
  2. wrap the 24g around that center wire 4 times to create a small coil. 
  3.  use the bent nose pliers to crimp the coil together and nudge to the top. We're going to leave the tail there to be able to hold the coil in place while we start the wrap
  4. whichever side the long end is on start by wrapping 'over' that side frame wire twice
  5. the pattern should be: over back wire twice, back under center twice,over front wire twice then back the other direction. alternating the over/ under.
  6. for now just nudge the wires close to each other with your thumb. 
Weave down about an inch and repeat the process on the other side to keep the tension balanced. At this point remove the the side pieces of tape. Clean any  tape residue from the wire and focal now. Continue weaving down each side. Depending on the size of your pendant you will have enough wire to meet both wraps at the center bottom. In my case I cut a third length to finish the bottom. If your wire breaks, or you need more length. Make sure you end on the center frame and leave a small tail. To start the connecting weave, wind your around the center frame wire at the bottom, lining up the wrapping wire at it's halfway point. Continue the pattern of weaving up both sides to end and meet on the center wire with 2 wraps where you left off


To finish the tails lay the wire over the center wire, and with the flat side of you cutters laying against the center wire, snip the wrapping wire leaving the tiniest fraction to tuck under the center frame wire. Use the tip of you bent nose or chain nose pliers to push that end under the frame wire to hide it. Do this with all tails.

So here's a good point to take a break and work the kinks out your fingers, and get some chocolate energy! Stay tuned for part 2 Embellishing, and the Bail. I will try to get the rest posted by tomorrow! :)
Bright creative blessings, Theresa
 Hey again all you creative beauties. Thanks for hanging in there for part 2 :) Were you brave enough to start wrapping? Maybe printed it off for later reference? (like I tend to do) My mum ( the Baroness) said she printed it off and hung it on the fridge! WOOHOO my artwork is still on the family art gallery :)

I left off with finishing the weave that cages the focal piece. Let's tighten that weave up by gently pinching the double coils along each of the frames. This will help even out the spacing between the coils.

Bail and Embellishments
1. Remove the tape (or clamps) clean any tape residue.
2.Bend the two center wires straight up at the 'V; junction
3.With the front of the piece facing you, bend the front center wire toward you so it's now at a 90 degree angle from the piece.
 4. Coil that wire around the base of the standing wire3 times. Snip, and tuck. You might have to file the end to smooth .

5. measure to four side tails to the same length, mark and snip so they are all the same.

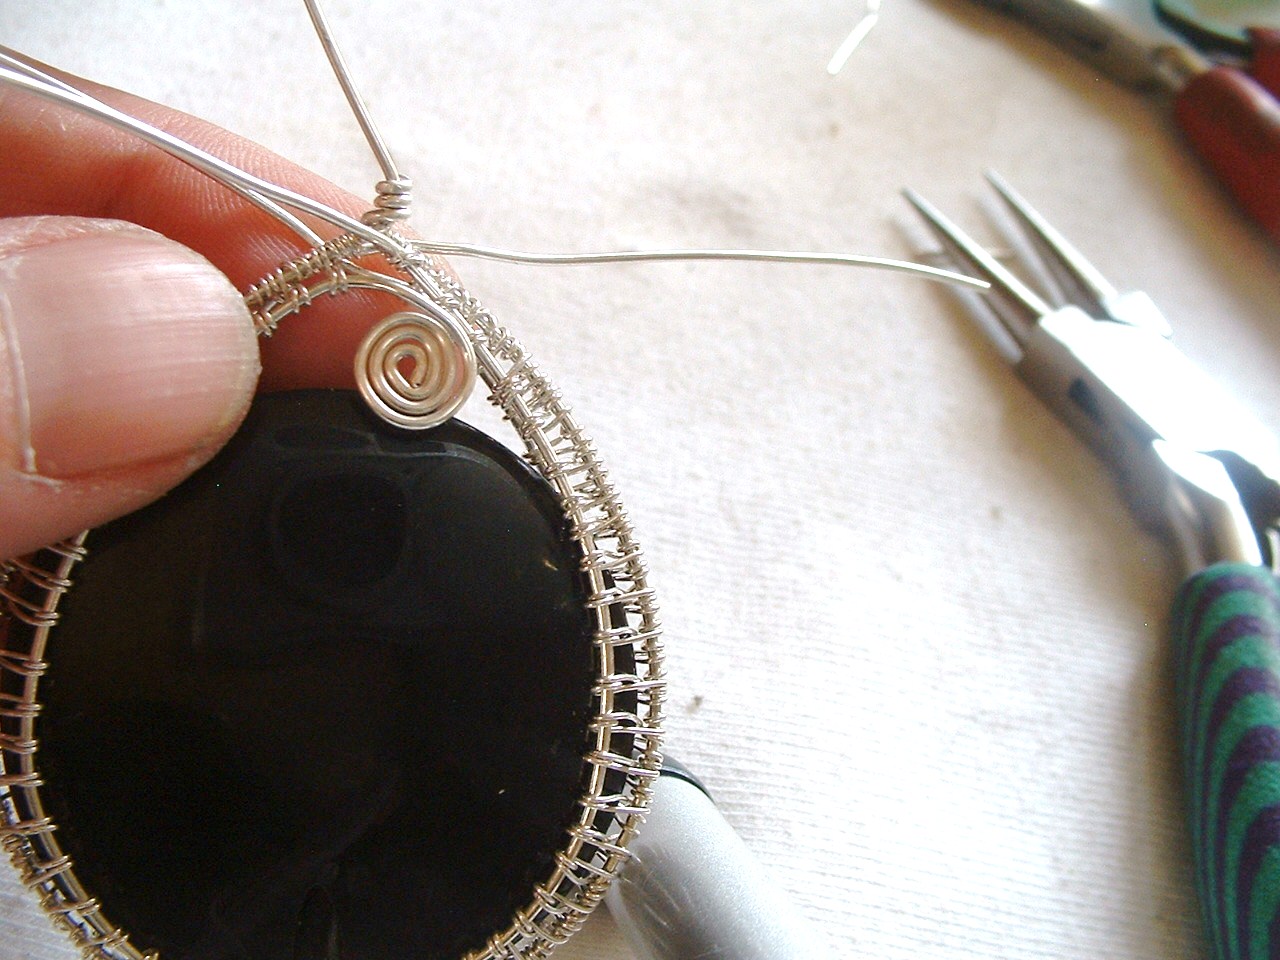
6. Using the tip of your round nose pliers make a tiny loop facing downwards in the end of each of the 4 tails.


7. to form the swirl hold the loop (gently) in your chain/bent nose pliers and bend the wire around. Don't use the pliers to move the swirl (might leave marks) use the pliers only to hold, and use your fingers to bend. Finish all 4 swirls, and push to place them where you want them.

8.To make the bail for the chain, bend the last standing wire towards you at a 90 degree angle at the base of the coil. grasp that point with your round nose pliers and wrap the wire away from you to form the loop
.


9. Keep holding the loop with the pliers and coil that tail around the top of the other coil once.Use the chain or bent nose pliers to pinch all 4 coils together. Then we are going to make another swirl with that tail, and push it down on the front in front of the coil on the bail.


So now what to you do with an UGLY spot? Small scratch/chip/weird drill spot on the focal? You can cover with further embellishments. Personally I won't sell this piece because the of the (big) ugly spot, but it was handy to use for this tutorial. To cover the ugly spot I made an 'S' shape swirl. Same process as above. Cut a 4 inch piece of the 20g wire and make the small loops at each end. One pointed up one pointed down. Then I loosened the very outer row on each swirl to be able to use the 24g wire to wrap it to the inner frame to cover the ugly spot. I did 3 wraps around each connection point, and snipped and tucked the ends.

Okay guys, that's it! :) If you try this out I would love to see your versions. Feel free to post pics on my facebook page or link here in the comments. I would love any feedback or questions you may have. Good luck!
Bright Creative Blessings, Theresa ♥


FAIR USE STATEMENT This website article may contain copyrighted material the use of which has not been specifically authorized by the copyright owner. This material is being made available for the purpose of education, commentary and criticism, it is being distributed without profit, and is believed to be "fair use" in accordance with Title 17 U.S.C. Section 107.